How-To
Tasmota to ESPHome Migration Guide 2026
Step-by-step migration from Tasmota to ESPHome on ESP8266/ESP32 for Home Assistant: backup, flash, entity parity, MQTT cutover, and rollback without cloud.
Quick answer: How do I migrate a device from Tasmota to ESPHome safely?
Back up Tasmota configuration and note GPIO templates, create an ESPHome YAML that mirrors relays and sensors, flash via USB or OTA from a test network, pair with Home Assistant’s native API, then retire the old MQTT entity. Never flash production loads without a rollback bin.
Source: ESPHome getting started
Executive Summary
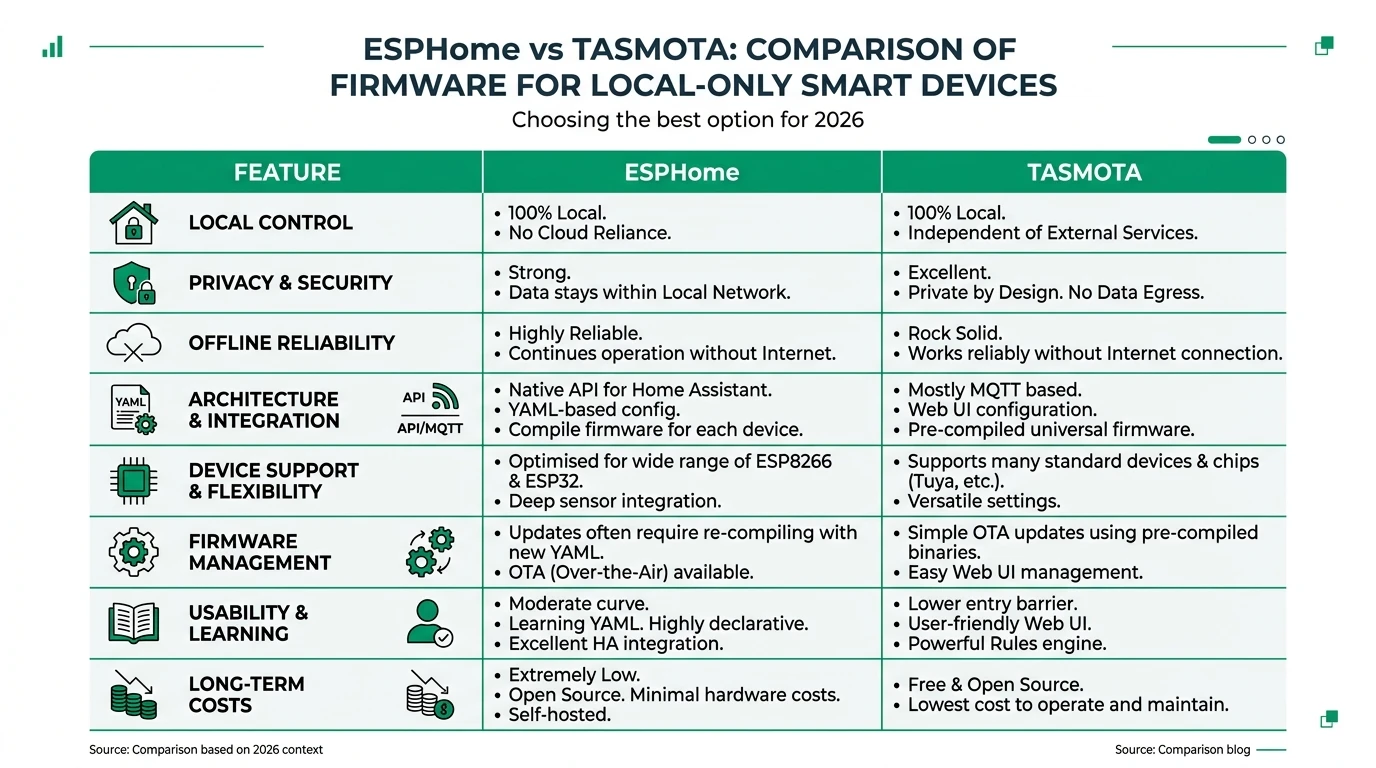
Moving from Tasmota to ESPHome is a local-only upgrade path for users who want Home Assistant’s native API, version-controlled YAML, and no MQTT broker dependency for those devices. This guide is not a repeat of our ESPHome vs Tasmota comparison—it is the operational playbook after you have already decided to migrate.
You will document hardware, export Tasmota settings, compile ESPHome, flash, validate entities, and clean up MQTT. For broker hardening during transition, see Tasmota MQTT TLS.
Bottom line: Migrate one device class at a time (e.g., all Sonoff Basics) so you can reuse YAML fragments and reduce home-wide risk.
Prerequisites and risk assessment
| Requirement | Why it matters |
|---|---|
| Physical access or stable OTA | Recovery if Wi-Fi fails mid-migration |
| USB–serial adapter | Many boards need serial for first ESPHome flash |
| Home Assistant backup | Roll back automations if entity IDs change (backup guide) |
Step 1 — Inventory and document Tasmota
- Open the Tasmota web UI → Configuration → Configure other and note GPIO assignments.
- Run
Status 0in the Tasmota console and save output (module type, sensors). - Export full backup from Tasmota Manage files if available.
- Screenshot MQTT topic and friendly names used in Home Assistant.
Step 2 — Map Tasmota components to ESPHome
| Tasmota concept | ESPHome equivalent |
|---|---|
Relay1 / Power | switch or output + gpio |
Button1 | binary_sensor with on_press |
ADC / energy IC | sensor + correct platform (hlw8012, etc.) |
| Rules | on_... automations in YAML |
Start from ESPHome device examples for your chip (ESP8266 vs ESP32).
Step 3 — Build and flash ESPHome
- Install ESPHome Dashboard (add-on or standalone).
- Create a new device YAML; set
wifiandapi(andota). - Compile and flash via USB; confirm logs show API connection.
- In Home Assistant, adopt the device or add
esphome:integration.
Use a test SSID first if you fear locking yourself out of Wi-Fi credentials.
Step 4 — Entity parity and automations
| Check | Action |
|---|---|
| Entity IDs changed | Update automations/scenes in HA |
| MQTT automations | Remove or disable old mqtt entities |
| Energy metering | Re-calibrate if readings differ |
Step 5 — Decommission Tasmota on that device
Once ESPHome is stable for 48+ hours:
- Remove the legacy MQTT device entry if unused.
- Delete orphan Tasmota automations.
- Archive the old Tasmota .bin for emergency rollback only.
Rollback plan
Keep the last known good Tasmota binary and user_config_override.h if you used custom builds. Serial flash back if ESPHome fails OTA—label cables TX/RX/GND to avoid magic smoke.
Checklist
- Export Tasmota GPIO and template settings before any flash.
- Match relay and sensor GPIO order in ESPHome YAML.
- Test on a bench device before touching in-wall modules.
- Snapshot Home Assistant before entity ID changes.
- Keep serial adapter and rollback firmware accessible for one week.
FAQ
Frequently Asked Questions
Can I OTA from Tasmota directly to ESPHome?
Use ESPHome’s documented flashing path; some users serial-flash first for reliability. OTA works after ESPHome is installed with OTA enabled.
Will my Home Assistant history be preserved?
New entities get new IDs unless you rename carefully—expect gaps in history for renamed entities.
Should I migrate everything at once?
No—migrate high-value or noisy MQTT devices first to reduce broker load.
What if I use Tasmota rules heavily?
Reimplement critical logic in ESPHome automations or Home Assistant; complex rules may need redesign.
Is Shelly easier than Sonoff for migration?
Hardware varies by SKU; compare vendor GPIO docs and our Aqara vs Shelly vs Tuya context—not a substitute for per-device schematics.
Primary sources
| ID | Source | URL |
|---|---|---|
| 1 | ESPHome docs | esphome.io |
| 2 | Tasmota commands | tasmota.github.io |
Conclusion
Migration is straightforward but tedious: success comes from documentation and incremental rollout. When finished, your MQTT broker carries fewer Tasmota devices—pair with MQTT TLS hardening for anything still on Tasmota.