How-To
ESPHome DIY Smart Plug: Privacy Build 2026
Build a local-only smart plug with ESPHome on ESP8266 or ESP32: safe mains wiring, YAML relay and energy monitoring, Home Assistant pairing, and no cloud.
Quick answer: How do I build a privacy-first smart plug with ESPHome?
Use a listed mains-rated relay module or a commercial ESP-based dev board certified for your region, flash ESPHome with a relay + optional energy sensor in YAML, adopt the device in Home Assistant via the native API, and block WAN egress for the plug’s IP so telemetry never leaves your LAN.
Source: ESPHome documentation
Executive Summary
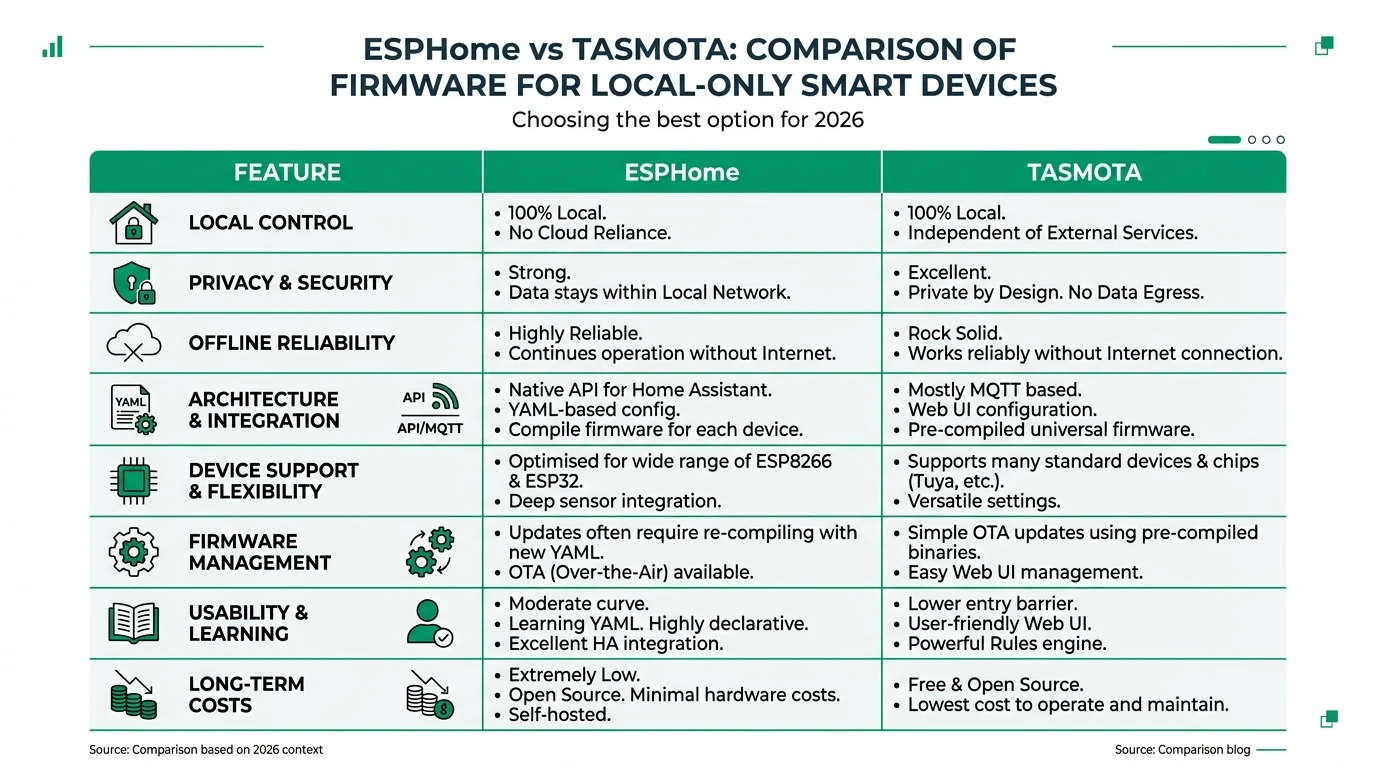
This is a project tutorial, not a repeat of our ESPHome vs Tasmota comparison. The goal is a single plug you control from Home Assistant with no vendor cloud, using patterns from the official ESPHome guides.
Bottom line: Prefer commercially assembled ESP smart plugs you only reflash, or qualified electrician work for bare relay modules—never energize a DIY breadboard on wall power.
What you are building (and what to buy instead)
| Path | Privacy upside | Risk |
|---|---|---|
| Reflash a Tasmota/ESPHome-ready plug | Fast; enclosure already listed | Vendor variance—verify GPIO1 |
| ESP32 + certified relay HAT in an enclosure | Full YAML control | Still requires mains competence |
| Off-the-shelf local plug | Lowest electrical risk | See best plugs without cloud |
Hardware checklist (conceptual)
| Item | Role |
|---|---|
| ESP8266 / ESP32 module | Runs ESPHome |
| Mains-rated relay module (or complete plug PCB) | Switches load |
| 3.3 V supply isolated from mains | Powers ESP safely (on commercial boards this is integrated) |
| Optional: HLW8012 / CSE7766 / similar | Energy measurement in YAML2 |
ESPHome YAML sketch (relay + API + Wi-Fi)
Structure your package with wifi, api (encrypted Home Assistant integration), ota, and a switch or output driving the relay GPIO. Match active-high vs active-low relay boards—incorrect polarity can weld contacts or leave load energized.
Example pattern (adjust GPIO and platform to your board—do not copy blindly):
esphome:
  name: diy-plug
  platform: ESP8266
  board: d1_mini

wifi:
  ssid: !secret wifi_ssid
  password: !secret wifi_password

api:
  encryption:
    key: !secret api_encryption_key

ota:
  platform: esphome

switch:
  - platform: gpio
    name: "DIY Plug Relay"
    pin: GPIO5
    id: relay1
Consult the ESPHome GPIO switch docs and your board’s pinout before flashing.
Flashing and adopting in Home Assistant
- Install ESPHome (add-on or CLI) and create the YAML package.
- Compile and flash over USB; confirm serial logs show Wi-Fi and API ready.
- In Home Assistant, Settings → Devices & services → ESPHome → Add and complete encryption key exchange.
- Snapshot HA before renaming entities (backup guide).
Privacy hardening after the plug works
| Control | Why |
|---|---|
| Firewall / VLAN | Block the plug from the internet (IoT blocking) |
| No cloud MQTT | ESPHome native API avoids a broker for HA-only setups |
| Strong Wi-Fi | Reduces rogue AP risk on 2.4 GHz |
Checklist
- Confirm relay GPIO polarity and maximum load before connecting anything.
- Use secrets for Wi-Fi, API encryption, and OTA passwords.
- Test with a bench load (lamp) before critical appliances.
- Block WAN for the plug IP after adoption.
- If migrating from Tasmota, follow the dedicated migration guide instead of mixing stacks.
FAQ
Frequently Asked Questions
Is this easier than flashing Tasmota on a Sonoff?
Often similar effort; compare workflows in ESPHome vs Tasmota and use migrate if you switch mid-project.
Can I get energy monitoring on a DIY plug?
Yes—many boards expose HLW8012/CSE7766-style chips; map the correct ESPHome sensor platform and calibrate per docs.
Should I expose ESPHome to the internet for remote control?
No—use VPN or tunnel solutions; see WireGuard HA guide and VPN comparisons.
Why not just buy a Shelly or Tapo?
Off-the-shelf is valid; this tutorial is for readers who want full YAML and no vendor app on the wire.
Does ESPHome phone home?
Open-source firmware does not require a vendor cloud; your privacy depends on your network policy and whether you add third-party integrations.
Primary sources
| ID | Source | URL |
|---|---|---|
| 1 | ESPHome | esphome.io |
| 2 | ESPHome GPIO switch | esphome.io |
Conclusion
A DIY ESPHome smart plug is a strong teaching project for local control, but safety and code compliance come first. If you only need reliable switching, start with our cloud-free plug roundup and graduate to ESPHome when you want full-stack ownership.