How-To
Install Valetudo: Robot Vacuum + HA Guide 2026
Install Valetudo on compatible robot vacuums for cloud-free maps and local control: firmware paths, MQTT, Home Assistant integration, and rollback if something breaks.
Quick answer: How do I install Valetudo on a supported robot vacuum?
Confirm your exact PCB revision is supported, download the matching Valetudo build from official releases, flash over USB or the documented OTA path without unplugging mid-write, join the vacuum to your LAN, open the Valetudo web UI, then add MQTT to Home Assistant with authentication—block WAN egress on the vacuum VLAN when stable.
Source: Valetudo
Executive Summary
This guide is the hands-on companion to our Valetudo privacy overview and best cloud-free vacuums roundup. It assumes you accept DIY risk in exchange for maps and control without a mandatory vendor cloud1.
Bottom line: Read compatibility first, flash once with a UPS-backed laptop, then prove MQTT before deleting the vendor app.
Compatibility and prerequisites
| Check | Why |
|---|---|
| Exact model + PCB | Valetudo targets specific SoCs; “looks like Roborock” is not enough1 |
| USB-UART or supported flash method | Recovery path if Wi-Fi fails |
| Backup of stock firmware | If your process allows (vendor-dependent) |
| Static DHCP or reservation | Stable IP for MQTT and HA |
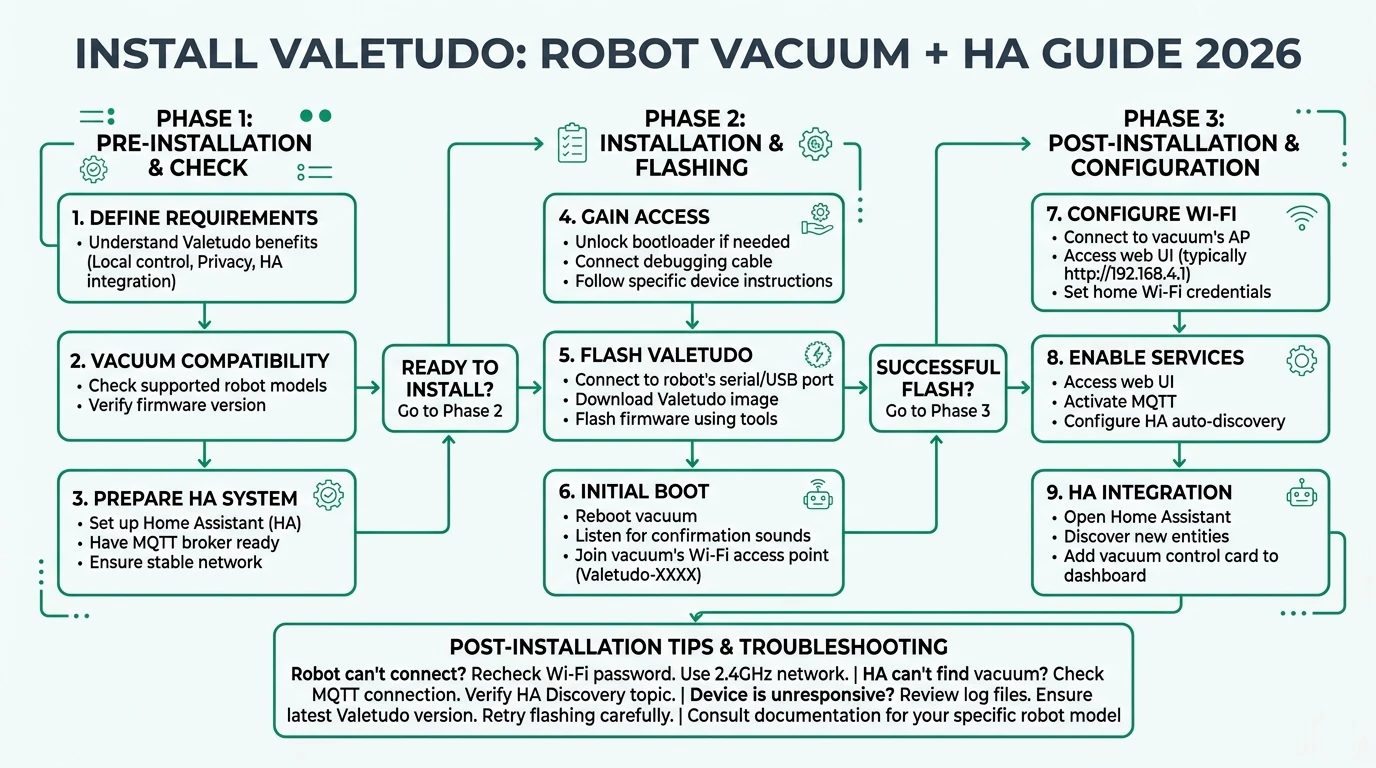
Installation outline (follow upstream docs)
- Read the current install guide on valetudo.cloud for your generation (names change over time).
- Put the robot in download mode per instructions—never power-cycle during flash.
- Write the Valetudo image with the tool recommended for your chip (vendor-specific).
- Boot and connect to the robot’s AP or join it to your SSID from the Valetudo wizard.
- Set MQTT broker host, user, password, and topic prefix—use TLS on the broker if possible (MQTT broker comparison).
- Home Assistant: add the MQTT integration and discover entities, or use the community integrations referenced in current docs.
Home Assistant integration patterns
| Pattern | Notes |
|---|---|
| MQTT Discovery | Fastest when topics match HA conventions |
| Manual YAML | Use when you rename entities for automations |
| Map card | Community map cards evolve—match the doc version you run |
Pair with blocking cloud calls once MQTT is stable.
Privacy wins and limits
| Gain | Limit |
|---|---|
| No vendor app for daily control | Firmware updates are your responsibility |
| Maps stay local if you do not forward ports | Some features (e.g., vendor-only voice) disappear |
| Revocable MQTT creds | Misconfigured MQTT can leak state topics |
If the vendor shuts down servers, you are already on a better footing—see legal/technical options.
Checklist
- Confirm support matrix before buying used hardware.
- Flash with laptop on AC power; avoid USB hubs that drop connection.
- Export Valetudo settings after first successful boot.
- Snapshot Home Assistant before renaming vacuum entities.
- Plan rollback: keep UART pins accessible until you trust the install.
FAQ
Frequently Asked Questions
Is Valetudo the same as rooting Android?
Different stack—follow robot-specific flash docs, not phone rooting guides.
Can I still use the vendor app?
Usually no concurrently—pick local control or vendor cloud, not both on the same firmware.
Does Valetudo work with Roomba?
Support is model-specific—check the official compatibility list1.
Will maps sync to the cloud?
Not if you block outbound traffic and never enable cloud bridges—verify with packet capture if paranoid.
What if I only want scheduling, not maps?
You can still use simpler automations via MQTT in Home Assistant without exposing map tiles.
Primary sources
| ID | Source | URL |
|---|---|---|
| 1 | Valetudo | valetudo.cloud |
Conclusion
Installing Valetudo is a project, not a toggle. When it works, you trade vendor polish for local maps and MQTT-first automation—aligned with the same privacy goals as the rest of this site’s local-first stack.